In short, here is how to convert DNG to JPG on Windows:

  1. 1️⃣ Download and install Batch Picture Resizer on your PC.
  2. 2️⃣ Add your DNG files or an entire camera folder and set JPG as the output format.
  3. 3️⃣ Click Start. The program converts every file locally, no internet connection needed.
Eugene - CEO at SoftOrbits, Candidate of Technical Sciences, has more than 16 years of expertise in software development, photo and multimedia applications, enhancing and transforming digital images and videos.
📅 Last updated on:  2026-06-06

Need to convert DNG files to JPG on Windows? Batch Picture Resizer handles single shots and entire shoot folders in one batch. Unlike web tools that cap uploads at 40 MB and require sending your photos to an external server, the program processes everything on your own PC. It is faster for large batches and keeps private or client photos off third-party servers. Whatever the camera, the converter reads the DNG and delivers standard JPEG output that opens in any app on any device.

What you will learn
Apply in Windows 10 and 11 Saves RAW quality kept in a shareable JPGEasy

How to Convert DNG to JPG on Windows

TL;DR

Six steps from download to finished JPG folder. The program runs on Windows 7 through 11 and processes all files locally with no upload needed.

Download and install Batch Picture Resizer

Go to the Batch Picture Resizer product page or use the download button above. Run the installer and follow the on-screen prompts. The program runs on Windows 7 through 11, both 32-bit and 64-bit systems. No internet connection is needed after installation.

 Batch Picture Resizer main window for DNG to JPG conversion..

Add your DNG files to the queue

Open the program. Drag your DNG files directly into the main window, or click Add Files to browse for individual shots. To convert an entire shoot folder, click Add Folder. The program also reads CR2, CR3, NEF, ARW, RAF, and more than 40 other RAW formats from the same queue without a pre-conversion step.

 select JPG as the output format..

Set the output format to JPG

Click the Convert tab. Choose JPEG from the format list. A quality slider appears below it. Keep it at 85-95 for most uses. This covers client delivery, portfolio export, and print. Drop to 80 if you need smaller files for web or email.

 JPEG quality slider in Batch Picture Resizer..

Configure output size (optional)

If you need web-sized copies, enter the target width in pixels in the Resize section. Tick Maintain the original aspect ratio to prevent distortion. Leave the fields blank to keep the original DNG dimensions in the output JPG.

 optional resize and aspect ratio settings..

Set the destination folder

Click Output folder and choose where the converted JPGs should be saved. You can mirror the source folder structure if your shoot is organized in sub-folders. You can also add a text or logo watermark at this step, applied to every file in the batch before export.

 choose output folder and start conversion..

Click Start

Click the Start button. Batch Picture Resizer processes every file in the queue using all available CPU cores. A progress bar shows files remaining. When the batch finishes, the output folder opens automatically.

 DNG to JPG batch conversion complete in Batch Picture Resizer..

Batch Picture Resizer Batch Picture Resizer

Batch Image Resizer is an easy, user-friendly tool that helps you resize multiple photos, convert, flip, mirror, or rotate them in batch mode.

Video Tutorials

Why Download a Desktop DNG to JPG Converter?

TL;DR

Online converters break at file size caps, stall on upload time, and send raw files with embedded GPS to external servers. Desktop software processes everything locally without any of these issues.

Most of the DNG-to-JPG tools in search results are web-based. For a single vacation snapshot on a fast connection, they work. For a real shoot, they break in predictable ways.
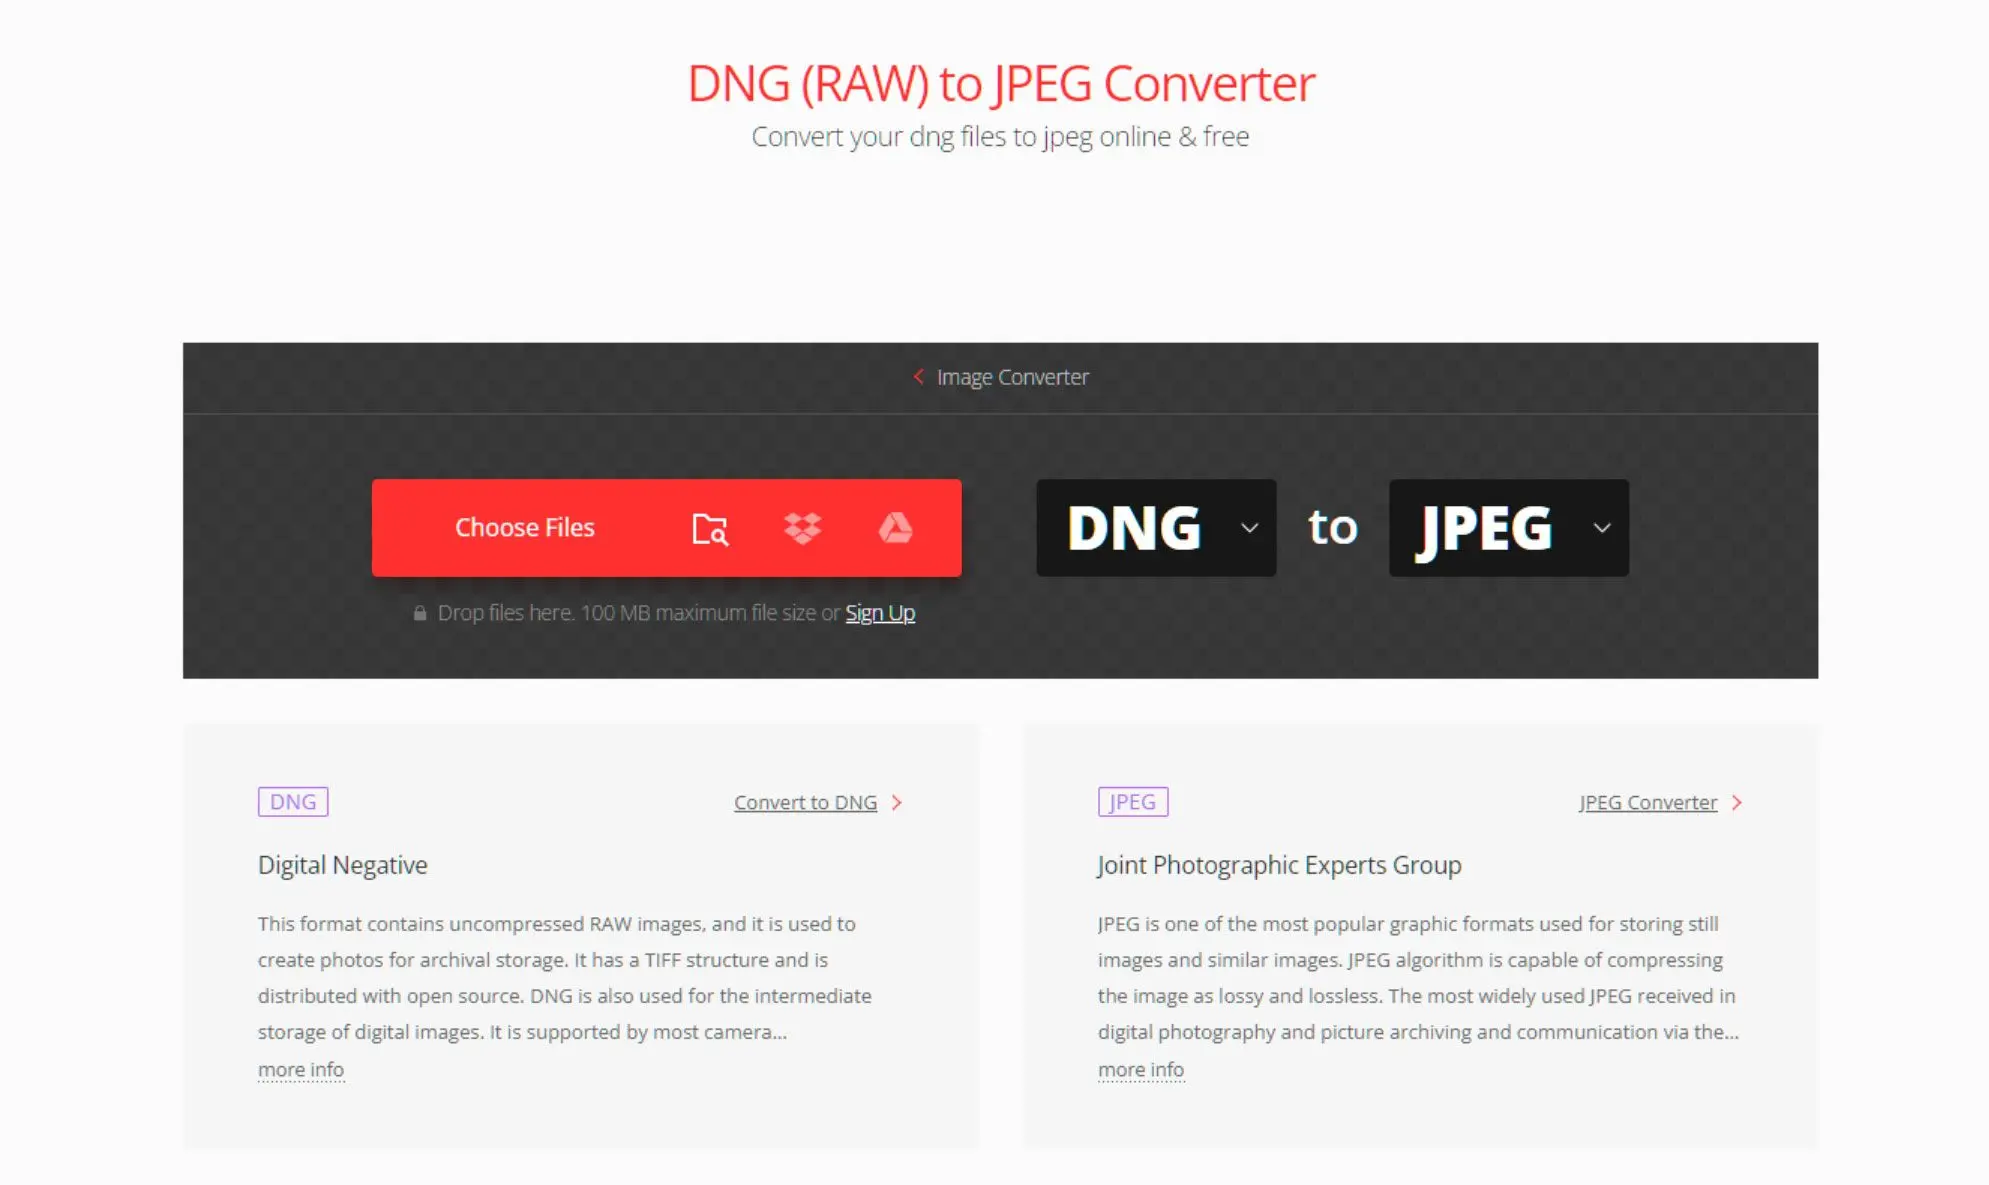
 DNG not opening in Windows Photos vs JPG that opens everywhere..

✔️ File size caps.

Zamzar's free tier caps uploads at 40 MB per file. A Leica Q3 DNG runs 65-70 MB; full-frame mirrorless files can top 100 MB. Even paid cloud converters limit free conversions per day.

✔️ Upload time.

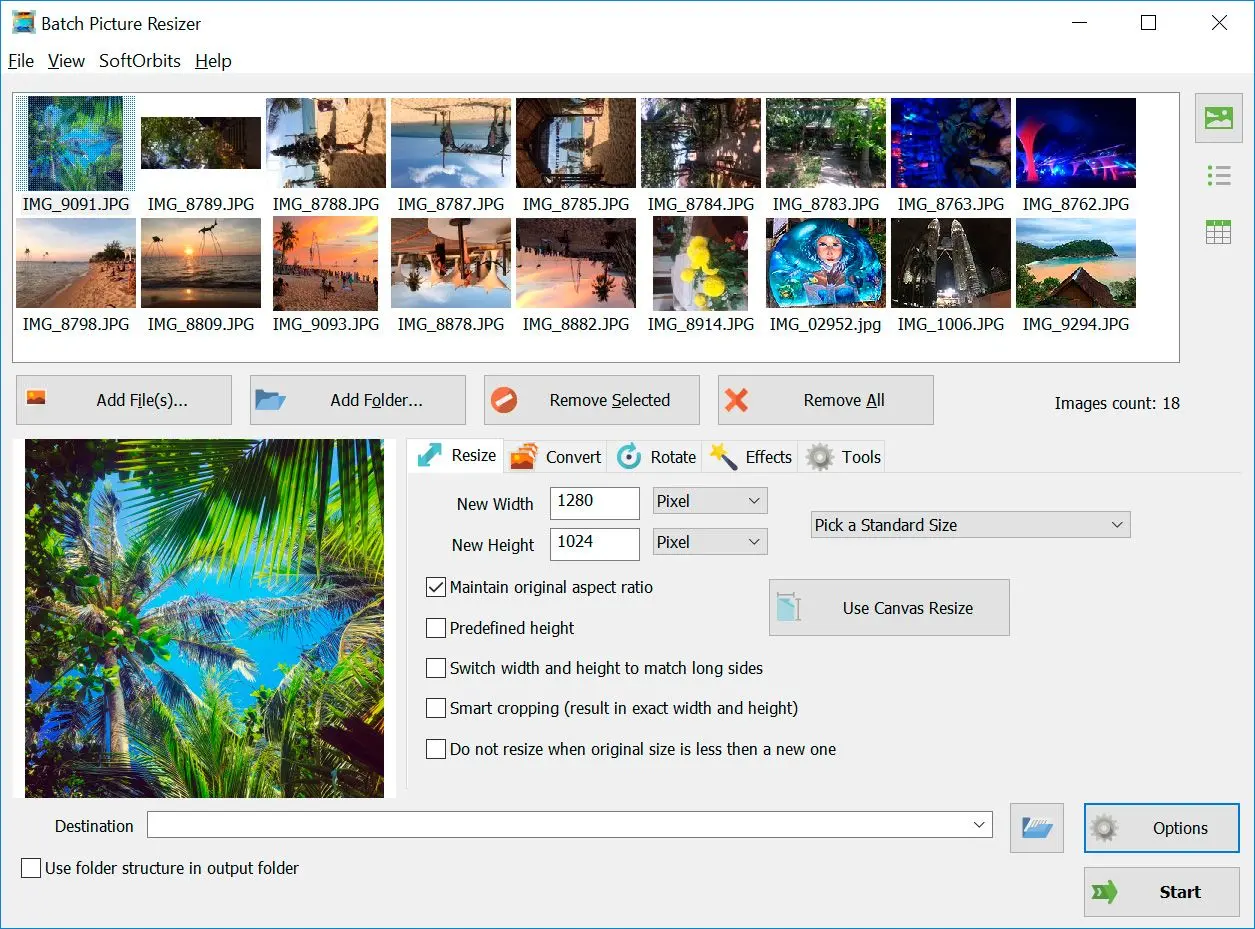
A 500-file wedding shoot at 20 MB per DNG is 10 GB of data. On a 100 Mbps connection, uploading that takes over 13 minutes before a single JPG is produced. The download adds another round. Batch Picture Resizer reads from your local drive and writes to a destination folder. The only bottleneck is your processor.

✔️ Privacy.

Raw files contain embedded GPS coordinates, camera serial numbers, and (in the case of client or event photography) images of people who did not consent to having their photos processed on a third-party server. Desktop software processes everything on your own hardware. Nothing leaves the machine.

What Cameras Save Files in DNG Format?

TL;DR

DNG is the native RAW format for Leica, Pentax, Ricoh, Hasselblad, Google Pixel, Samsung Galaxy in Pro mode, DJI drones, and iPhone with Apple ProRAW. Canon, Nikon, Sony, Fujifilm use proprietary formats that Batch Picture Resizer reads directly.

Not all cameras call their RAW files DNG. Here is which ones write DNG natively, along with what the alternatives look like.

 DNG to JPG local conversion without uploads or file size limits..

✔️ Leica.

The M11, Q3, Q2, SL2 and current Leica models write DNG as the native RAW format. File sizes range from 50 MB (M11 standard) to over 100 MB (M11 multishot mode). These files regularly exceed the free tier limits of online converters.

✔️ Google Pixel.

Pixel phones shooting in RAW mode save DNG files in the 13-25 MB range depending on model and resolution.

✔️ Samsung Galaxy.

The Galaxy S6 and every flagship Galaxy since then saves DNG in Pro or Expert RAW mode. Recent flagship files run 15-30 MB per shot.

✔️ DJI drones.

The Mavic 3, Mavic 3 Pro, Air 3, and Mini 4 Pro all support DNG output. A Mavic 3 DNG is roughly 43 MB; smaller Mini series drones produce 15-25 MB files.

✔️ Hasselblad.

The X2D 100C and X1D II both produce DNG. Files from the 100 MP sensor regularly exceed 100 MB.

✔️ Pentax and Ricoh.

Pentax DSLRs and mirrorless cameras save DNG alongside the proprietary PEF format. The Ricoh GR III and GR IIIx write DNG natively.

✔️ iPhone with Apple ProRAW.

iPhone 12 Pro and later support Apple ProRAW, which saves a DNG-compatible file at 20-35 MB per image.

✔️ Canon, Nikon, Sony, Fujifilm.

These brands use proprietary RAW formats. Canon writes CR2 and CR3; Nikon uses NEF; Sony uses ARW; Fujifilm uses RAF. None produce DNG natively. Batch Picture Resizer reads all of these Sony ARW, Fujifilm RAF, and other RAW formats directly, with no intermediate DNG conversion required.

Adobe DNG Converter vs a DNG-to-JPG Converter: What's the Difference?

TL;DR

Adobe DNG Converter turns proprietary RAW files (CR2, NEF, ARW) into the DNG archival format. It has no JPG export option. Getting from DNG to JPG requires a separate export tool.

Searching for "adobe dng to jpg converter" sends many users to Adobe DNG Converter. The result is confusion, because the two tools solve different problems.Adobe DNG Converter is a free standalone tool from Adobe. It takes manufacturer-specific RAW formats from major camera brands and converts them into the open DNG format for long-term archival. The idea is that DNG, as an open format, will remain readable by future software even if a manufacturer's proprietary format loses support. Adobe DNG Converter outputs DNG and stops there. No quality slider, no JPEG option, no resize control.

A DNG-to-JPG converter like Batch Picture Resizer reads a DNG file (or proprietary RAW directly) and produces a finished JPEG at the quality and size you set.
If your workflow requires an intermediate DNG for archival, the process runs in two steps. First convert the proprietary RAW to DNG using Adobe DNG Converter. Then export from DNG to JPG using Batch Picture Resizer. Since Batch Picture Resizer reads all major RAW formats natively, the Adobe step is usually unnecessary. Add your Canon or Nikon RAW files directly to the queue and skip the intermediate conversion.

Batch Picture Resizer Batch Picture Resizer

Batch Image Resizer is an easy, user-friendly tool that helps you resize multiple photos, convert, flip, mirror, or rotate them in batch mode.

Batch DNG to JPG Conversion: Processing Large Photo Sets

TL;DR

Batch Picture Resizer has no hard queue limit. It uses all CPU cores, mirrors folder structure in the output, and supports command-line mode for overnight or automated jobs.

Batch Picture Resizer puts no cap on queue size. Users regularly process full wedding shoots and multi-day travel collections: 500 to 2,000 DNG files in a single run. The program loads all available CPU cores during conversion, so a modern 8-core PC turns a large job into a background task.

For large or organized shoots:

✔️ Add Folder with subfolder scanning.

If your shoot is organized by date or location, use Add Folder and check Include subfolders. The output mirrors your source folder structure.

✔️ Test before committing.

Test a small sample first. Convert 5-10 files and verify color and quality before committing to the full batch. This catches color-shift issues before they affect hundreds of files.

✔️ Command-line mode.

Batch Picture Resizer includes a command-line interface for scripted or scheduled jobs. Useful for tethered shooting pipelines or running large conversions overnight via Windows Task Scheduler.

✔️ Output drive strategy.

Write output to a different drive than the source DNGs to avoid read/write contention on the same disk during long batches.

DNG to JPG Quality Settings: Choosing the Right JPEG Level

TL;DR

The JPEG quality slider controls compression and file size. Q85-90 covers most professional needs. Export once from the DNG original and keep the DNG as your master file.

The quality slider in Batch Picture Resizer runs from 1 to 100. Here is what each range delivers in practice.

 JPEG quality comparison across Q80, Q90, and Q95..

✔️ Q80 (web, social media, email).

File size is roughly 40-60% smaller than a Q95 export. At normal viewing size the difference from higher quality is invisible. This is close to Lightroom's standard web export level.

✔️ Q85-90 (client delivery, portfolios, print-on-demand).

The practical sweet spot. Files are significantly smaller than near-lossless exports; visible artifacts appear only under 150%+ zoom in a photo editor.

✔️ Q92-95 (archival JPG, high-quality inkjet print).

Compression artifacts are only visible at 200%+ zoom. File sizes run 2-3 times larger than Q85.

✔️ Q95+ (diminishing returns).

Moving from Q95 to Q100 roughly doubles file size with no real-world visual improvement. Reserve Q100 for intermediate files in multi-step editing workflows.

✔️ Re-saving note.

JPEG is lossy. Every re-save at less than 100% quality discards additional data; artifacts accumulate across multiple saves. Export once from the DNG original at your target quality level. Keep the DNG as the permanent master and never re-open the JPG for further editing.

DNG to JPG Converter: Full Feature Set

TL;DR

Beyond conversion, Batch Picture Resizer can resize and watermark in the same pass, with DPI control and EXIF metadata carried through automatically.

Beyond format conversion, Batch Picture Resizer includes the following in the same operation:


✔️ Resize.

To a target size by pixel count or percentage scale, with aspect-ratio lock and quality-preserving algorithms.

✔️ Smart crop.

To exact output dimensions without manual editing.

✔️ Rotate, flip, or mirror.

In bulk across the entire batch.

✔️ Text watermark or logo watermark.

With position, opacity, and font controls, applied before export.

✔️ Output DPI.

For print or web publishing specs.

✔️ EXIF metadata preservation.

Camera model; lens; GPS coordinates; date/time; and copyright fields all carried into the JPEG output.

✔️ Folder structure mirroring.

Source sub-folder organization replicated in the output.

✔️ Command-line interface.

For automation via batch scripts or Windows Task Scheduler.

✔️ 40+ RAW input formats.

All major manufacturer formats read directly alongside DNG, with no pre-conversion step.

Pitfalls when Converting DNG to JPG

TL;DR

Most conversion failures come from OS compatibility gaps, online tool file size caps, and quality settings chosen without a test batch first.

✔️ Renaming the extension does not convert the file.

Changing a file from .dng to .jpg does not re-encode the raw sensor data. Multiple users on Microsoft Answers describe getting only an application icon after trying to open DNG files in Windows Gallery, not a viewable JPEG. You need a converter that decodes the RAW and re-encodes as JPEG.

✔️ File too large for the free online tool.

Zamzar's free tier caps uploads at 40 MB per file. Professional DNGs from large-sensor cameras routinely exceed that. Most free online converters hit similar walls between 40-100 MB. Desktop software has no file size limit.

✔️ DNG thumbnails breaking after a Windows update.

Several Windows 11 updates broke DNG preview in File Explorer for users with the Raw Image Extension installed. Nine users confirmed the regression on Microsoft Answers, with reinstalling the extension having no effect. Workaround: convert a JPG review copy for culling; keep DNG originals untouched.

✔️ Windows Photos cannot preview DNG files before import.

Windows 10 and 11 Photos users report they cannot see DNG files in the import dialog, which forces importing blind and deleting unwanted shots afterwards. Converting a JPG contact sheet in advance solves this.

✔️ Low quality setting causes irreversible loss.

Converting DNG at Q60 or Q70 discards image detail permanently. There is no way to recover it from the JPG. Set quality to at least Q85 for anything printed or delivered to a client. Keep the DNG as the permanent master.

✔️ Adobe DNG Converter does not export JPG.

Adobe's free tool converts proprietary RAW files into the DNG archival format. It has no JPEG export option. Users who download it expecting JPG output need a second tool. Batch Picture Resizer reads both DNG and proprietary RAW directly and exports to JPG in a single step.

DNG to JPG on Windows 10 and Windows 11

TL;DR

Windows has no built-in DNG decoder. The Raw Image Extension adds support but has broken after several OS updates (a documented regression that reinstalling the extension does not fix).

Windows Photo Gallery and the Photos app do not open DNG files without a codec. The experience is consistent: open a shot and get an error or a blank placeholder. One Microsoft Answers thread captures it directly: "I tried to open some raw .dng photos in windows live photo gallery, but did not get the picture; only the photogallery logo."

Microsoft distributes a free Raw Image Extension from the Microsoft Store that adds DNG codec support to Photos and File Explorer. But it is not reliable. A separate Answers thread documents a wide regression: "Ever since I installed mid-October Windows updates, the file explorer stopped showing .dng files thumbnails, I can only see the icon. This bug is really messing with my workflow! Already tried reinstalling the raw file extension viewer, but to no avail." Nine users confirmed the same regression in that thread, with reinstalling the extension having no effect.

The practical answer is conversion. JPG files open in every Windows app and media viewer without any codec or extension dependency.

Batch Picture Resizer Batch Picture Resizer
DNG to JPG converter for Windows 11 and 10. Batch Picture Resizer converts entire DNG folders locally, sets quality and resize in one pass. Free trial download.


🙋Frequently Asked Questions

Batch Picture Resizer offers a free trial that converts DNG files with full functionality. The trial adds a small watermark to output images. A one-time license removes it with no subscription required.

Windows Photos can open DNG files with the Raw Image Extension installed and export to JPG one file at a time, with no quality slider or batch controls. For anything beyond a single file, dedicated DNG to JPG software is the practical choice.

Yes, JPEG is lossy. At Q85-95, the difference from the DNG source is invisible at normal viewing size. The main risk is re-saving an existing JPG; each re-compression adds artifacts. Export once from the DNG at your target quality, then keep the DNG as the master.

Leica (M11, Q3, Q2, SL2), Hasselblad (X2D, X1D), Pentax DSLRs, Ricoh GR III, Google Pixel phones in RAW mode, Samsung Galaxy in Pro mode, DJI drones (Mavic 3, Air 3, Mini 4 Pro), and iPhone with Apple ProRAW. Canon, Nikon, Sony, Fujifilm use proprietary formats. Batch Picture Resizer reads those directly without a DNG conversion step.

Batch Picture Resizer has no hard queue limit. Users regularly convert full wedding shoots and multi-day collections, 500 to 2,000 or more files, in a single run. The program uses all available CPU cores throughout the batch.

Yes. Batch Picture Resizer runs on Windows 7 through 11, both 32-bit and 64-bit. A 64-bit system with at least 4 GB RAM is recommended for large RAW batches.

Yes. Batch Picture Resizer preserves camera model; lens; GPS coordinates; date/time; and copyright in the JPEG output. Many online tools strip or truncate EXIF during processing.

Yes. In Batch Picture Resizer, the resize settings sit on the same screen as the output format. Resize and conversion happen in a single pass with no additional step or application required.